Monday, June 28, 2010
(2d Design) #4 Illustration from Lyrics
Project 4 is easy. Find 5 songs in which you really respond to the lyrics. They lyrics can be what ever you want...try to make it as clean as possible. Type up (or download) the lyrics and bring them to class glued into your journal. When you hand in your journal I will count them off for credit. We will be making a cd booklet that illustrates the lyrics of the songs mashed up. This project is inspired by the CD Vertebraille. I have no idea what kind of music it is, but the jacket cover is very interesting. For your November Breadth piece, we will be making this book. (possible printing it on Blurb.com). For know just find the lyrics of songs you love and we'll go from there.
(2D Design) #3 Still life Photography


For your 3rd Breadth piece, I'd like for you to begin to collect interesting objects that you can bring to school to photograph. We might manipulate them digitally or paint them or image transfer them, we'll see. The more interesting the object the better, the more story you can make from it the better.
Please bring all of your still life materials during the 1st week of school. We will photograph during that time so that you have images to work with over the course of 1st quarter.
(2D Design) Character Design
Part One: So, one major project we will be working on in the fall is a poster for the animated series, Star Wars: The Clone Wars. I don't really watch or even know to much about this series, but it has a drawing style that is very unique. Your task is to dive into the world of Star Wars. Learn about the characters, the plot, the history. Come to class at the beginning of the year being able to give a presentation about the story. You might want to also view the online comic at the below address.
http://www.starwars.com/clonewars/comic/#/?page=-1
How fun is this homework...you are being asked to watch cartoons.
Part Two: You will now be designing a new character in the style of the Clone Wars. Your character must come from a planet that you invent, a race your create, and a history. You must draw it in the style of the Clone Wars, but you are introducing a new character. Think about what they look like? What kind of environment did it grow up in? What do they eat? What kinds of clothing, weapons, head ornamentation, jewelry, vehicles, etc. How does the character get introduced into the Clone Wars story line? You will make a presentation to the class of your ideas during the month of October, but your sketches and a 1 page description of your character and it's history are due on the first day of school.
Use the template below to draw your character. We will complete this project in the month of October.
Part Three: In addition to the character, you will be designing the kind of vehicle it travels in. It might be organic or inorganic. This is a test of your drawing skills in both shading and in perspective drawing.
I did a quick search for "futuristic vehicles" on Google and saw some cool stuff that might give you ideas for inorganic vehicles. Come to class with detailed drawing of your vehicle. We will end up scanning this drawing and hand coloring it in Photoshop. Please draw a top, front and right view of the vehicle just like you did in the character design image.
Sunday, June 20, 2010
(2D Design) Typography
Typography design in the foundation of graphic design. Designing your own fonts can really add a lot to your portfolio of work for AP review. For this assignment you'll be designing 3 complete fonts. To get to this process, I'd like for you to sketch-out 8 different designs of 6 letters. Then from these 8 samples of fonts, pick three and design the entire alphabet and the number 0-9. Come to class with all of your final sketches.
Use the sketchbook with the grid lines to help you complete this project. Or get creative and experiment with different ways to create fonts. You're 1st project back from school will be to work with your font design.
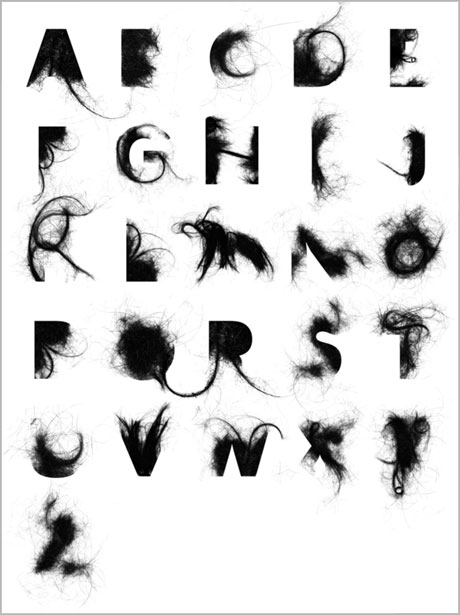 This font is made to look like hair in the shower drain.
 This font face was made from 19th century found clip art. The artist collaged them together and then made a font. If you chose to do something like this, you must make the font black and white. I will show you how to make it work like a font.
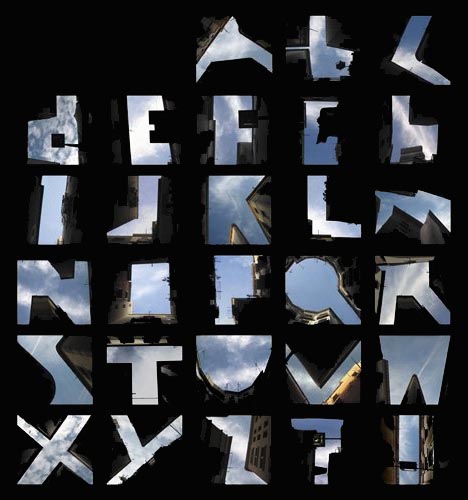 This font is made photographing buildings and then compositing them into Photoshop. This is a very creative way to make a font. The negative space is what makes the letter, not the positive space.
 This font is actually a 3-D constructed object. If you want to experiment with this kind of technique, make sure you create an original font.
 You might want to create an ornate font design. This could be really beautiful. Font design is about developing a cohesive design with beautiful lines.
Again your assignment
8 sketches of 6 letters of rough ideas
3 completed font design with alphabet and numbers.
Use the sketchbook with the grid lines to help you complete this project. Or get creative and experiment with different ways to create fonts. You're 1st project back from school will be to work with your font design.
This font is made to look like hair in the shower drain.This font face was made from 19th century found clip art. The artist collaged them together and then made a font. If you chose to do something like this, you must make the font black and white. I will show you how to make it work like a font.This font is made photographing buildings and then compositing them into Photoshop. This is a very creative way to make a font. The negative space is what makes the letter, not the positive space.This font is actually a 3-D constructed object. If you want to experiment with this kind of technique, make sure you create an original font.You might want to create an ornate font design. This could be really beautiful. Font design is about developing a cohesive design with beautiful lines.Again your assignment
8 sketches of 6 letters of rough ideas
3 completed font design with alphabet and numbers.
Saturday, June 19, 2010
(All AP Students) Update/Check-in
So, the summer will quickly get away from all of you. So, to keep everyone on track I want to photograph your work-in-progress and post them on the blog. To post your work, please comment on this posting. Make sure your work is a low resolution for that it will load quickly (72 dpi is a good choice). Feel free to make some positive comments or share your finds on YouTube with the rest of the group. It's always helpful to teach each other!
Please post by these two due dates.
July 6th
August 1st
Please post by these two due dates.
July 6th
August 1st
(Rose and Katrina) Oil Painting #2
Take a look at this wonderfully simple and exquisitely beautiful oil painting. AP graders eat this kind of work up. Why? It looks real. The artist using repetition with the repeating lines with variety with the one pillow that has a floral pattern. It is unified with an analogous cool color scheme. It's all the design principles perfectly placed. I want this piece to inspire you. Painting something as simple and yet complex as this painting. Don't copy, just learn from it and bring something of yourself to the table! Have a great summer. 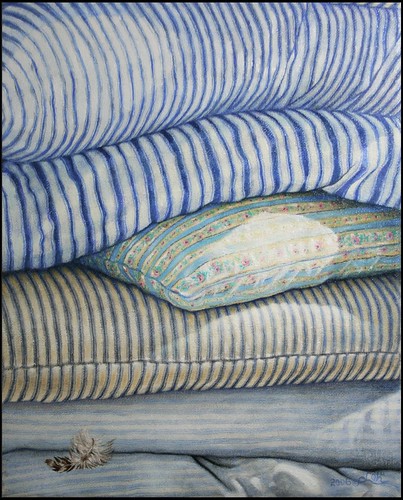
(Rose and Katrina) Oil Painting #1
Substitute 1 of the pastel fruit drawings with oil paint. You select the canvas you want to use and paint, paint, paint. Make this one really count for the portfolio. Try to bring it in almost complete form, but if it needs some more work, you're sure to have time during the fall semester.
DON'T FORGET THAT YOU CAN'T WIPE UP LINSEED OIL WITH A RAG AND THEN THROW IT AWAY. LINSEED OIL WILL SPONTANEOUSLY COMBUST UNLESS IN A GLASS JAR. BE SAFE
DON'T FORGET THAT YOU CAN'T WIPE UP LINSEED OIL WITH A RAG AND THEN THROW IT AWAY. LINSEED OIL WILL SPONTANEOUSLY COMBUST UNLESS IN A GLASS JAR. BE SAFE
(Drawing) Portrait Photographs
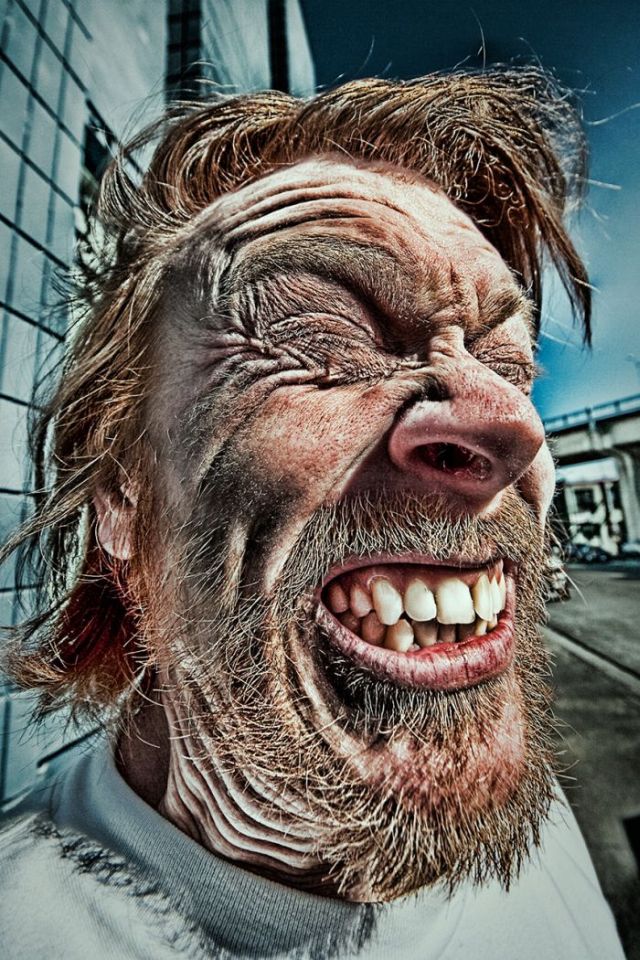 One of the Breadth Units we will be working on in the fall is a portrait unit. But, students often get a little board with the standard portrait and the AP graders recognize work that is just made for an assignment. For for one of the pieces we will start in the 1st quarter we will be making watercolor and colored pencil drawing of your face in the most crazy position you can make it. I've put an examples below. Look on the website to see more.
 http://izismile.com/2009/11/18/funny_and_crazy_faces_46_pics.html
They are not pretty, right! This piece of artwork for your portfolio is as much about moving beyond your comfort zone as it is improving your drawing skills.
To prepare for the unit, you'll need to bring 10 - 8" X 10" prints of different EXTREME POSSES. We will have a good laugh on the 1st day of school and them select the craziest. These should prove to give your portfolio some extreme punch! BRING YOUR ALREADY PRINTED PHOTOS ON THE FIRST DAY. IF YOU PRINTER IS OUT OF INK, THEN GO TO KINKOS!! We will definitely need them on the 1st day of school.
(Drawing) Tree Drawings
Tree Drawings
You should have a packet of white charcoal/pastel paper. For this assignment, I'd like for you to focus on drawing all kinds of different tree drawings that you make from looking at trees. DO NOT JUST MAKE THEM UP. The AP graders want to see that you are drawing from observation. Fill your entire booklet with tree drawings using any kind of drawing medium you can think of. Use pens, pencils, charcoal, ball point pens. Try using water with your charcoal pencils, try smudging it with a Q-tip, try hatching, cross hatching, etc.
Use different kinds of compositions, triangular composition, rule of the 3rds, zig-zag. You want to spend a lot of time on this project and try to get at least 1 or 2 Breadth pieces for the fall. 

(Drawing) Charcoal Drawing-Cloth
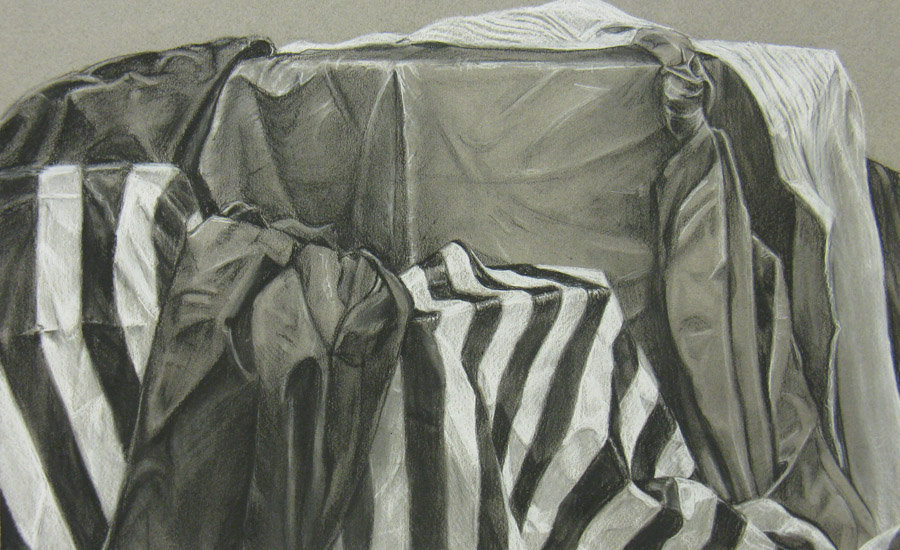
Charcoal Drawing
YOu have been given two black and white charcoal pencils. Set up a still life using cardboard boxes and cloth like the image on the left. AP wants to see that you can handle drawing the folds, shadows and highlights of a cloth that is draped over something. Select different kinds of cloth with patterns, stripes and solids. Have different values of cloth.
Then draw way. Make this one count because it should take you a very long time to finish, you don't want to have to make this up when you get back to school. This drawing should take you 25 hours to complete. Really make it count. You will want to go to Michael's and pick up some large piece of gray pastel/charcoal paper.
YouTube has a huge number of tutorials out there to explain how to build up value in charcoal drawings. Don't hesitate to look at some videos first.
(Drawing) Pastel Assignment 1
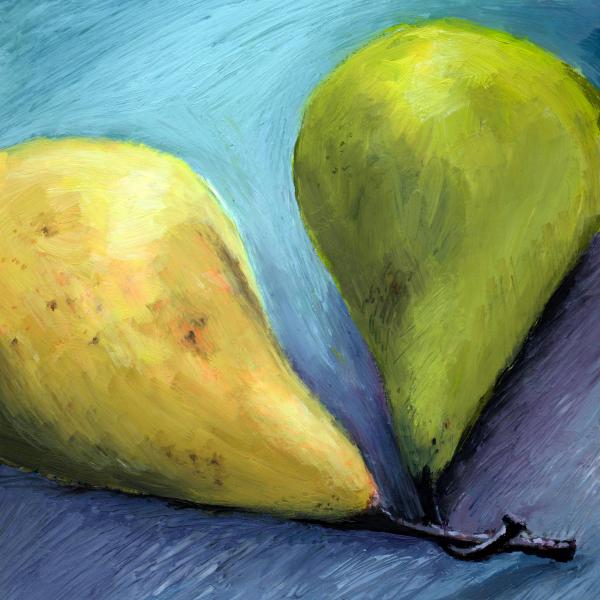
So, hopefully you've picked up a huge pile of drawing materials. For your first assignment I'd like for you to get familiar with the Prismacolor Nupastels by completing 3 drawings of pears. Go to the store buy 4 pears and another fruit or vegetable of different colors and textures. Make sure the pears have some great spots on them. You don't want to buy perfect pears, make sure they have good surface texture.
Use the colored pastel paper in the packet to complete the following assignments:
Pear Assignment #1
1. Set up 2 pears in an interesting way
2. Use expressive, but realistic marks to draw the pears.
3. Shade in the background. Don't leave it the color of the paper. Take a look a this article of paiting shadows. http://painting.about.com/od/colourtheory/a/shadows_Impress.htm
Pear Assignment #2

1. Place 1 pear and another fruit or veggie on a window sill like the image to the left. take a look a the shadows. Do they make interesting shapes. Would your still life be better if you added another object with the fruit.
2. sketch out the still life on one of the pastel papers.
3. For this drawing you want it to be as realist as possible. Use the Nupastel for this drawing. If you find that you can't get the pastels to stick because there is so much on the paper, then lightly spray it with some hair spray. This will fix the drawing allowing you to add more layers.
 Pear Assignment #3
 For the third drawing, set up the 4 pears. Arrange them in a way that create interesting negative space like the drawing to the left. You might want to create a view finder and use it to "look" at your still life. The website below has some images of kids using a view finder.
complete the drawing using Nupastels. Pay close attention to the balance between positive and negative space.
http://www.goshen.edu/art/ed/westv.html
Sunday, June 13, 2010
(3-D) Design Problem #6: Consumer Monster
 This crazy sculpture is made from stapling paintings on paper together. Who would of thought that a stapler could be an artist's tool. For Design Problem #6 we aren't actually going to get started on the project until later. But what you do need to do all summer long is collect all the product boxes your family uses for 2 months straight. Those can include, tooth paste boxes, cereal boxes, boxes that soap come in, etc. The more colorful the better, the more boxes the better. Bring them to school during the first week. You'll need a lot of boxes so don't flake out on collecting them!
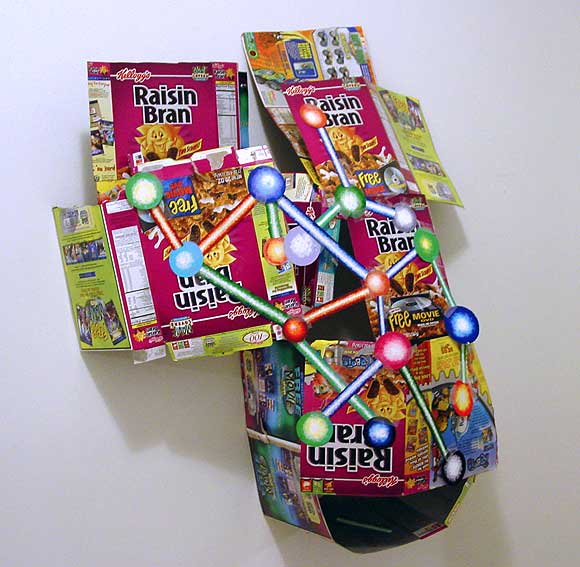
(3-D) Design Problem #5: Introduction to Stone Carving
Stone is a unique material. It is difficult to work with and yet people are always intrigued at it's beauty.
For your first project of the summer, you have been provided a piece of alabaster or soapstone.
During the first two weeks of the summer I want you to plan-out 5 different ideas. You may take a
traditional approach and carve an organic form that takes advantage of the translucent qualities of the
stone. Or, you might want to take a less traditional approach using mixed media materials. Either way
you must demonstrate 2 principles of design and keep the design of the sculpture abstract or at least
representational abstraction. I've include 2 examples of what not to do at the end of the blog.
http://www.laurarusso.com/artists/sivak_m.html

a great example of mixed media and carved stone. This piece is
someone representational, but still has a abstract or dreamlike quality to
the work.
http://jimwillis-studio.com/
 This is a great example of a mixed media abstract sculpture that truly highlights
the aesthetic qualities of each of the materials. If you would like to experiment with exotic woods, you
might want to check out MacBeth Hardwoods of Berkeley. Combining alabaster with beautiful dark,
exotic woods is a great why to create contrast in your sculpture.
Monday-Friday 7:30AM - 4:30PM
Saturday 9:00AM - 3:00PM
930 Ashby Ave. - Berkeley, CA 94710
(800) 479-9907 / (510) 843-4390
(510) 843-9378 fax
berkeley@macbeath.com
Google Maps
http://www.soldwedelsculptures.com/index.html

Below are two examples of what not to do:


For your first project of the summer, you have been provided a piece of alabaster or soapstone.
During the first two weeks of the summer I want you to plan-out 5 different ideas. You may take a
traditional approach and carve an organic form that takes advantage of the translucent qualities of the
stone. Or, you might want to take a less traditional approach using mixed media materials. Either way
you must demonstrate 2 principles of design and keep the design of the sculpture abstract or at least
representational abstraction. I've include 2 examples of what not to do at the end of the blog.
http://www.laurarusso.com/artists/sivak_m.html
a great example of mixed media and carved stone. This piece is
someone representational, but still has a abstract or dreamlike quality to
the work.
http://jimwillis-studio.com/
This is a great example of a mixed media abstract sculpture that truly highlightsthe aesthetic qualities of each of the materials. If you would like to experiment with exotic woods, you
might want to check out MacBeth Hardwoods of Berkeley. Combining alabaster with beautiful dark,
exotic woods is a great why to create contrast in your sculpture.
Monday-Friday 7:30AM - 4:30PM
Saturday 9:00AM - 3:00PM
930 Ashby Ave. - Berkeley, CA 94710
(800) 479-9907 / (510) 843-4390
(510) 843-9378 fax
berkeley@macbeath.com
Google Maps
http://www.soldwedelsculptures.com/index.html
Below are two examples of what not to do:
(3-D) Design Problem #4: Line as Form

In Design Problem #4 you will learn how to use line as the primary design element to create a 3-dimensional form. You've been provided with a spool of steel wire and a light wire. This summer, you'll create an abstract with a lot of movement. You can wrap the wires or solder the wire, but don't glue it (it will just pop off). when you return to school we will be using hand-made paper pulp as a sculpting material. Your wire sculpture will be coated, covered or dipped into the pulp to create texture and/or pattern.
In this example to the left, you'll see the artist has used wire to make long loops that hang on the wall. She then covered each of the wires with pulp that is dyed pink. The piece ends up looking very fleshy, or skin-like. The variation in pinks add to this effect. I suspect that the wires were dipped into a vat of pink paper pulp to achieve the texture (check out this short video on paper making in Nepal http://www.youtube.com/watch?v=TLFJ3sWnxIo&feature=related)
This is an interesting work, but the piece would be much more dynamic if it were a piece in the round, a sculpture you can walk around.
The piece below looks very different than the previous piece. The artist in this piece use wire to make 3-dimensional shapes, almost petal-like. He then attached the "petals" together. Once the form was constructed, he then wrapped
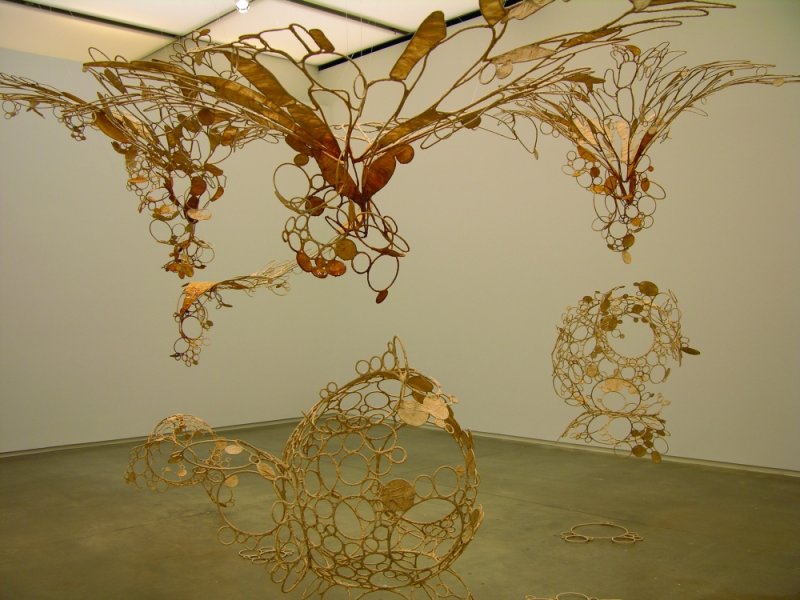
Ranjani Shettar

Ruth Azawa- made the work above. She crochets or knits wire into formal/symmetrical
sculptures that often hang from the ceiling on invisible wires.

this artist dipped individual wires into wax. you may want to experiment with wax on your
sculpture to see what it does.

this is a functional sculpture. you might want to think about turning the sculpture into a
functional object. The sculpture below is like a nest of colored sticks. if you want to create
a nest-like sculpture with your wire, where each wire "twig" is a different color, then sculpt
the "twigs" and then we will assemble after we put pulp on the wire.

 This elegant sculpture uses thin sheets of hand made paper to
 define positive space. Notice how the artist has moved the eye around the sculpture.


You might want to create a free standing sculpture instead of a hanging sculpture.
(3-D) Design Problem #3: Modular Tessellation
Design Problem Overview: For your 4th summer assignment you will be carving a piece of balsa-foam. You've been provided with a piece of 6" X 9" piece of foam. First, cut the the piece into a 6" X 6" square. Keep the other small piece for another project. You will be creating a relief inspired by the work of Chiara Corbelletto, but your work will end up having your own unique design to it. You will
be carving an interesting shape that links together like a tessellation. This summer, I want you to finish
carving the shape. You'll receive credit for finishing this part of the project in September, but we will
finish it in October. We will be making a silicone rubber mold of your carving and then casting multiple
pieces in either plastic, plaster or use the mold as a press mold for clay. We will discuss about mold
making in October. But, please spend some time reviewing the o depending on your preference. I
You must have the piece link together like example #1 and #2. If you approach the Design Problem in
this manner you will end up with a relief sculpture If you really want to go for it and make a piece that
fits together


Example 1: Chiara Corbelletto
this sculpture is made up of 15 of the exact same shape. They have
been arranged in a repeating pattern. The interesting thing is that she
could add an infinite number of pieces to build a huge wall piece.
Notice how the contour of the shape is simple but interesting and the
elevation of the shape changes. When the pieces are put together, this
variation in elevation is what makes the varying values in the piece.
Example #2: This piece of public art also made by, Corbelletto, is also make
from interlocking pieces in a tessellation.

(3-D) Design Problem #2: Modular Geometric Repetition

For Design Problem #2 you will be building a mockup of sculpture using cardboard that will later be translated into sheet metal and painted a high gloss surface. I was inspired by the sculpture that is pretty easy to make and you learn a great about tools and materials.
The sculpture can be found on the website listed below.
Notice on the site how the artist approached
Notice on the site how the artist approached the pattern to make the piece. Also, look at the little round things that hold the pieces together. Those are called rivets. Eventually, you will create your sculpture out of metal and rivet it together. Check out the youtube.com video that teaches pop riveting
For this summer what I'd like for you to do is to construct your sculpture out of the cardboard you were given in class and glue it together. Below, you'll see the template the artist used. Each of the dotted lines was bent into place. To do this in paper you'll need to first score the cardboard. Scoring is the process used the "dent" the paper so that the fold is very clean. Check out the video below to learn how to score a piece of paper.

For your sculpture you won't be using the exact pattern shown above. Instead, I want you to design 5 different templates, fold and cut them how every you want and then decide what pattern you will make the final sculpture. Save all 5 templates you made and turn them in with your final mock-up sculpture on the 1st day of school.
We will build the final sculpture in the month of October.
(3-D) Design Problem #1: Artist Journal
For your 1st project, you'll be collecting images to glue into your journal you got on the last day of school. Your journal will become the primary book you draw all of your sketches for class projects and concentration ideas.
Research 10 artists that you are interested in that might inspire a concentration. Remember the concentration is a collection of 10 pieces of artwork in a particular medium. I'd like to get familiar with the artwork that you are interested in. Please collect only 3-dimensional pieces of work. To complete the task print off a few pieces of art from the each artist, glue the images into your journal, write their name and the websites you got the information from.
Points: 10 pts
Due: Second day of school
(3-D) Welcome Sculpture Students
This blog will be our primary form of communication over the summer. Please use it! Each of you have the ability to comment on posts. Posts are the individual assignments that I put on the blog. You will be asked to periodically photograph your progress and add it to the blog. Please review the steps and protocols listed below for posting a comment.
To add a comment: A blog is only a good as a classes participation. What the blog will offer is a way for everyone to help each other with their assignments. If you have a question about how to do something, where to get materials, or you find a cool artist, then add a comment....comment on others' questions. My hope is that we can build an online community with this site. When you go to college, many of your classes will require to post information on a blog of some kind. Remember that this site is for school and "social-networking". So keep the language professional and positive.
If you need help with making a comment, you can check out the website below.
http://www.google.com/support/blogger/?hl=en
Summer Assignment Overview
You have 5 summer assignments called Design Problems. Some of the Design Problems are major projects that you need to finish while others are simple assignments that are meant to get you started on a project or get your thinking. All of the assignments will be posted by June 21st so that you may work on multiple assignments at one time. Remember the bigger commitment you make during the summer, the easier it will be to complete your portfolio!!!
Design Problem #1: Artist Journal - Collect images of sculptors that inspire you and paste them in your journal along with information.
Design Problem #2: Modular Geometric (Mockup) - You will make a template and a cardboard mock up of a sculpture we will be making using sheet metal in the fall.
Design Problem #3: Modular Relief - carve a tessellation form that we will make a silicone mold of to cast multiples from
Design Problem #4: Line as Form - using wire to create a form that will have paper added to it.
Design Problem #5: Stone Sculpture - introduction to small format stone carving.
Design Problem #6: Consumer Monster- mixed media project using recycled products.
MATERIALS FEE
I've just purchased each of you $45 of materials. Please bring a check or cash to the office before June 18th and give it to myself or Pat Fink in the main office. Let her know it is for materials for Art. She will give it to the right person.
Tuesday, June 1, 2010
Welcome new and returning AP students
I want to say welcome to Advanced Placement Art. I'm very excited about what this summer and next year can bring. Please email me at davidhevel@yahoo.com when you have completed registering for the blog.
Subscribe to:
Posts (Atom)